Bobbin Work + Shirred Tie = Simple T Top
- Londa
- Jan 5
- 3 min read
Updated: Feb 6
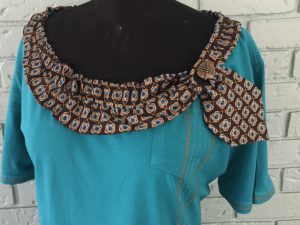
Bobbin Work stitched embellishment plus a shirred men’s tie adorn this simple purchased men’s T-Shirt for a quick and easy and UNIQUE knit top.
While I was preparing to tape some up-cycle episodes for It’s Sew Easy TV, this top just kinda ‘happened’ as an ‘extra’ at the very end of my creative work. While it didn’t ‘make it’ on the taping due to time restrictions, I love it, and therefore am sharing some quick how-to’s.

Close-Up Views
#1. See the shirred tie at the front, with wide end caught with a button.
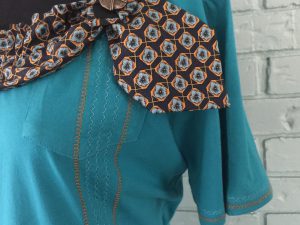
#2. Close-up of tie end and button. ALSO – look vertically down from the button to see the 5 rows of bobbin work.
#3. Back view – showing narrow part of the Tie shirred around the neckline, and shirring with 1/8″ elastic at back waistline. See my Sensational Shirring Pattern for complete details on all different ways of shirring.
Construction Steps
Cut down the neckline by folding in half at center front, center back.

2. Add Bobbin Work. Wind heavy decorative thread (as used in sergers) on the bobbin of your machine. You will be stitching WRONG SIDE UP at the machine. LOWER the bobbin tension (also try to increase needle tension). Drop-in bobbin systems generally work FAR easier for successful Bobbin Work than vertical-riding bobbins in a case. For those, get an EXTRA bobbin case on which your loosen the screw. TEST! Check your manual. For my big fancy Brother, there is actually an additional bobbin case (even for horizontal-riding bobbin system). It is WORTH it to check into this. You need to TEST TEST TEST!
Select loose, OPEN, long stitches. Here is what I used, and the settings – on My Brother regular+embroidery machine. Stitches 1-22 and 2-18 in decorative stitch panel. SW = Stitch width. SL = Stitch length T = Tension
I ran a series of these stitches down the left side front, right through the patch pocket, and also around the short sleeves. Below at the left is how my 2 stitches appeared from the outside. I mirror-imaged the buttonhole-looking one and did a ‘pattern’. The photobelow shows actually running the stitches from the WRONG side of the top.
3. ‘Finish’ the neckline edge of the top. I always do this using clear elastic for retention and ‘snap’. This top would be a good one to ‘practice’ as, in the end, the neckline doesn’t show anyway. Below is a clip from my 3 Disc DVD on EVERYTHING I know about sewing on knits, Stretching Your Knit Sewing Know-How. Click HERE to order that 'DVD' in digital format.
4. Prepare your men’s tie. Remove the interfacing, but do so trying to keep the back hand stitching intact. If you can’t do this, try it with leaving in the interfacing… get ahold of that back hand-stitching thread (it is generally a strong thread), and pull it to ‘ruche’ or gather the tie. Compare with the length it needs to be to cover the entire neckline of your top – then knot off. Honestly, on my top, somehow I left in the interfacing on the narrow half of the tie, and removed it for the wide half of the tie.
Pin into place, distributing the gathers, and allowing the wide end of the tie to flip and be the ‘finish’ at the shoulder as shown below. A button and some additional hand-tacking holds it in place AFTER the next step.

5. Using clear monofilament thread in the needle at my machine, (I used Smoke since I was on a dark color), and a fairly long stitch, I stitched the tie to the top right through the center, of the tie.
6. Add shirring stitches at the uppermost edge of the wide half of the tie that is at the front of your shirt – if you style it like I did. I used a heavy thread as shown – Buttonhole Craft thread from Coats n Clark. I found this necessary, as the top edge of the tie just ‘flopped’ forward. Adding the additional shirring at the top edge (invisibly) did the trick of holding it up, and against my body.
This top sold from my website, but I plan to make another one soon.


Comments