


Sunflower Fence Mural Painting Fun
- Londa
- Jun 14, 2020
- 7 min read
Updated: May 26, 2022
The New View from the Sunroom Sewing Studio
This Spring/Summer my focus has been working outside in our backyard, the ‘view’ from my Sunroom Sewing Studio. Here’s the result after roughly a month of serious planning and 5 glorious days of painting fun. Conclusion: Painting is making a 3D idea into 2D, while sewing is taking a 2D idea, sketch or picture and transforming it into 3D. Interesting….. I guess I realize I enjoy both. Staying home so much the last few months has killed my excitement for making new clothing, so turning to this project was exciting.

Finished Mural
The ‘Naked’ Wall Challenge and Planning
The dirt between the brick retaining wall and the aged fence is worse than bad. I decided to give up on getting rid of all of the rock and weeds, and instead to try to paint a mural and plant some softening greenery in large pots in front of it. Dear hubby did power wash it to start.

The boring challenge wall.
Of course, off to Pinterest I went and put together this Board of ideas, but below is the real inspiration that got me inspired. I really liked the firefly, especially it’s transparent character, but the flowers as being all pretty much the same: that didn’t excite me.

Here’s the other mural I found that I liked, but again – the flowers were all the same, so kinda boring. And the bee – kinda reminded me of the ‘Killer Bees’. I’m more of a butterfly and firefly gal. What I did learn from this mural though was again seeing the transparency of the firefly wings and the white highlights around some of the flower petals.

I truly am not an artist, but I’ve always been able to copy pictures and do what I see. Years ago, like in 4th grade or so, I would set my horse statues up and draw them over and over and over… I also managed a craft store years and years ago (Creative Corner in Danville, IL) when tole painting was big – and then folk art, so I learned about shading, washes, etc. All that came in handy in this project – for which I’m grateful.
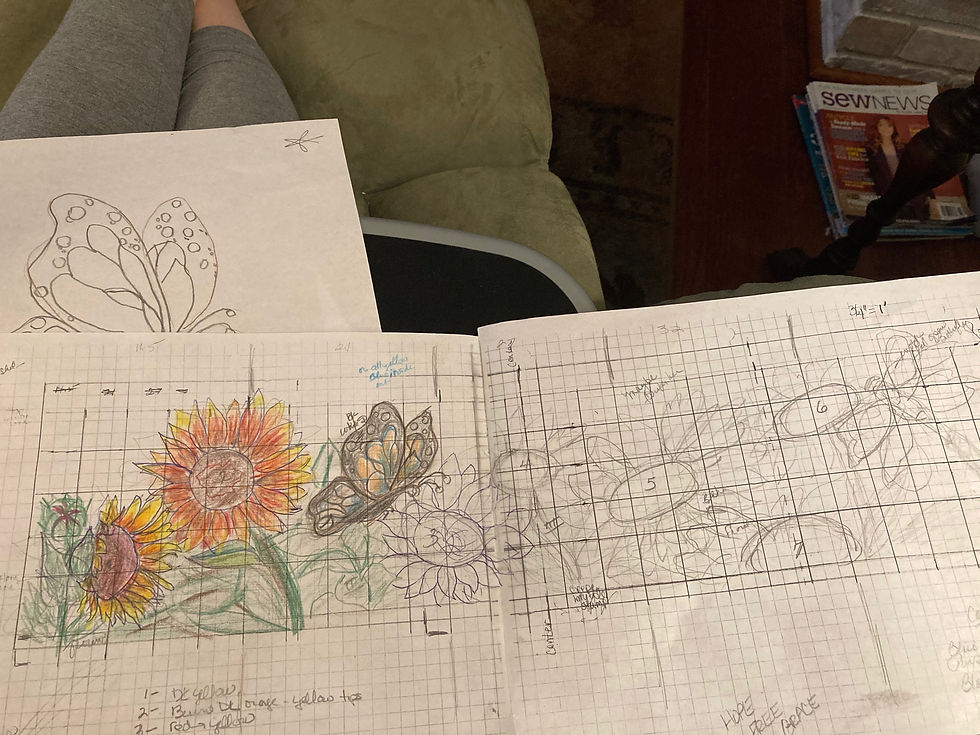
Graph The Wall
The length of the wall is 25′ and 6′ tall. With hubby’s help, chalk, and a yardstick, we made horizontal lines starting at 8″ down then every 12″ down marking it all into 1′ sections. Then, I scaled it out on graph paper: 3/4″ = 1 foot and started drawing. Here’s what I came up with…and I finished coloring it in with colored pencils, and assigning each of the sunflowers I’d found online a position in my plan.
Test the Waters…Can I Really Do This?
After seeking out a mural artist online, I learned how very important it was to paint with an exterior primer everywhere where I would be painting…meaning I would need to paint it all TWICE. That idea took a bit of attitude adjustment!
I talked to the experts at Sherwin Williams about what kind of primer, but bought a gallon of Vaspar brand at Lowe’s at a better price. While I didn’t need a gallon, I did ultimately use a good half gallon. (I have made a list of all of my leftovers and am willing to sell it all as a group.) To make it easy, I transferred it to a gallon plastic ice cream container with lid, which was lighter to hold in my hand. For brushes, I worked with a 1″, 2″ slanted and 3″ most of the time.
After all that graphing and planning, I began to question if I could really pull this off. So….I decided to give it a try behind our shed on the same fence. It was SO MUCH FUN, and turned out pretty well. I shared it with a couple of friends and family members who all said it was good, so I figured, why not? Here arfe pictures of both the primer painting and my final ‘TEST FLOWER’.

If you look closely, you can see that I figured out the logistics of my paint source table at this point also. I hit upon the idea of cheap disposable aluminum pans with covers as lightweight paint pallets. Ultimately, ‘to go’ boxes were even better, but I didn’t have many of those. Paper towels needed to be handy, as did water for adding fluidity to the paint, doing ‘washes’, and washing out my brushes. Large wild rice and nut plastic containers with lids worked GREAT for that – and I had saved a whole bunch of those. An old shower curtain covered a table from the sewing studio. You can see below how I used a large butterfly clip to hold my sketches and inspirational photos (for petal and center painting) right up there on the wall where I could see them. Remember…I said I could COPY, not just ‘paint’ from my head! I also challenged myself to work on layering on this flower – where the petals flop over onto the large sunflower center. I learned that leaves would be a challenge – especially the veining.

Sketch & Prime
With my foot by foot composition completed, I just had to go copy it onto my fence wall, square by square. Since there is at the most 4′ between the fence and the retaining wall, that was a challenge since I couldn’t easily ‘back up’ to see where I was at. However, I did manage – using both carpenter’s pencil and regular chalk to do the sketching. Or course, there were some subtle changes along the way but this was my game plan.
Shop & Add Color
The online mural artist said to use good quality acrylic paint. Honestly, I had planned (and even made a pallette) of the latex house paints I had on hand and just using those. The wall is exposed to the east so it gets strong morning sun, but after 12 noon it is pretty shady. I figure that’s a good thing as far as durability. However, I decided to check out the ‘quality’ acrylic paints at Hobby Lobby. I ended up settling on FolkArt Multi-Surface Matte paint by Plaid and Liquid Acrylic by Artist’s Touch. I lucked out and got it all at 30% and 50% off. I bought these colors: Black, White, Brown, 2 Yellows, 2 Greens, Orange, Red, a Dark Blue, Aqua, and Teal: a total of 12 colors – which, again, I have put up for sale in local FB for Sale pages. Ultimately, I did not use any of the leftover house paints that I had lugged out there – as I was just truly afraid that they wouldn’t hold up to even the temperate weather here in TN. I also purchased an Exterior Clear Polyurethane for coating it all as protection once done.
Here are some process photos of the priming process.


To make the painting experience fun, I listened to my favorite podcasts, had water handy in a cooler, and wore my hat plus plastic gloves to protect my nails, applied sunscreen and lots of bug spray. At the left in the photo above, is the remnants of a Crepe Myrtle tree that we cut down to this stub. I like how it ‘softens’ the mural…and will definitely try to get some plants going in front and the sides of it. On my list are: Russian Sage (at either end, as will grow quite tall), Cleome, and hopefully alot of Mint.
A RE-DO Butterfly
The back lower end of my butterfly looked too big, so I added the black upper wing – and YUCK! Knowing I’d never be happy with it and thinking about it all night long after doing some more online hunting for blue butterflies, I decided it worth trying to FIX it.

I painted him out using the primer. Then, I re-painted that area to look like the original fence, blending brown, yellow and white paint.

Here is my selected butterfly from online research. I went to my FedEx office with the image on a thumb drive to print him out. Then, I drew him to scale and colored him in. I truly think that work helped organize my brain as to what would go where even before I tried to draw it up on the wall. In my practice picture there is also another butterfly, but I decided he was really too hard to try to copy, so I truly kinda combined them both, skipping the white spots on the body of the Pipevine Swallowtail (photo at the left) with the body of the other guy.

Here’s an up close snapshot of my RE-Work: I had figured out on the first try that making skinny black lines with a paintbrush was next to IMPOSSIBLE with the vertical grain of the very worn fence. I hit on the idea of using a really fat black Magic Marker for that work – as you see me doing here.

TADA – my Final Butterfly
If you look closely, he’s even sucking pollen from the sunflower center wit his probiscus.

Biggest Challenge
As I worked, I felt my composition needed something tall added at the left end. I found this inspiring photo online and thought it would be perfect, but a challenge for sure! I studied and assessed this for days before trying it and that only after I’d made myself a list of how I would go about attacking it.

Here’s my rendition: not perfect, but good enough.

Additional Challenges
The biggest challenge was the texture of the weather-worn fence: vertical grooves on each board, plus the nail holes and knots. When doing a watered-down colored ‘wash’, I had to go with the grain but if the subject was horizontal, I had to work against the grain, which was a huge challenge for any ‘dry-brushing’ accents, as only the upper surfaces of the boards caught the paint.
Additionally, boards shrink as they age, leaving large gaps between boards. I felt I needed to squish paint in there as well for continuity of color. Perhaps you can see that gap/challenge in this photo. At the top I got it better than at the bottom, but I felt I had to try.

Time to Seal/Protect?
Even though I think I’m DONE, I want to let it set a few days to convince myself. HOWEVER, as I always teach in creative sewing: “Stop Before You Think You’re Done” and “Less is Best”…
I did test the polyurethane (exterior grade, and clear as to not alter the color), and this is how it looks about 3 hours afterwards. This took half of a quart, and I purchased 2 quarts, so I realize I should have purchased a gallon. Likely I’ll return the 2nd quart and get a gallon!

Then too, hubby is adding a deck waterproofing coat to the fence (of which there is ALOT) around our yard, which is turning out to cost a fortune. We’ll see.
Update - 2 years later: The paint is starting to flake - especially closer to the ground level, much to my distress. An artistic cousin says that she feels it makes it look 'vintage'. I think I'll wait until the summer of 2023 to do any touch up work...
Comments